

Variations
Variations define how your software gets installed on customer servers. Each variation has its own Docker Compose configuration, system requirements, and installation behavior. Use variations to offer different tiers or configurations of your product — for example, "Airstudio - Basic", "Airstudio - Pro", and "Airstudio - Enterprise".
Go to your product's Variations tab and click Add Variation to get started.
Variation Details
Name
The variation name is shown to customers on their My Products page. Make it clear and descriptive — include both your product name and the tier so customers know exactly what they have access to.
| Good | Avoid |
|---|---|
| Airstudio - Basic | Basic |
| Airstudio - Pro | Pro Edition |
| Airstudio - Enterprise | v1 |
Purchase Access
The Purchase Access section controls which payment products grant a customer access to this variation. You can link multiple products from different providers (Stripe, Lemon Squeezy) to the same variation.
Adding a product
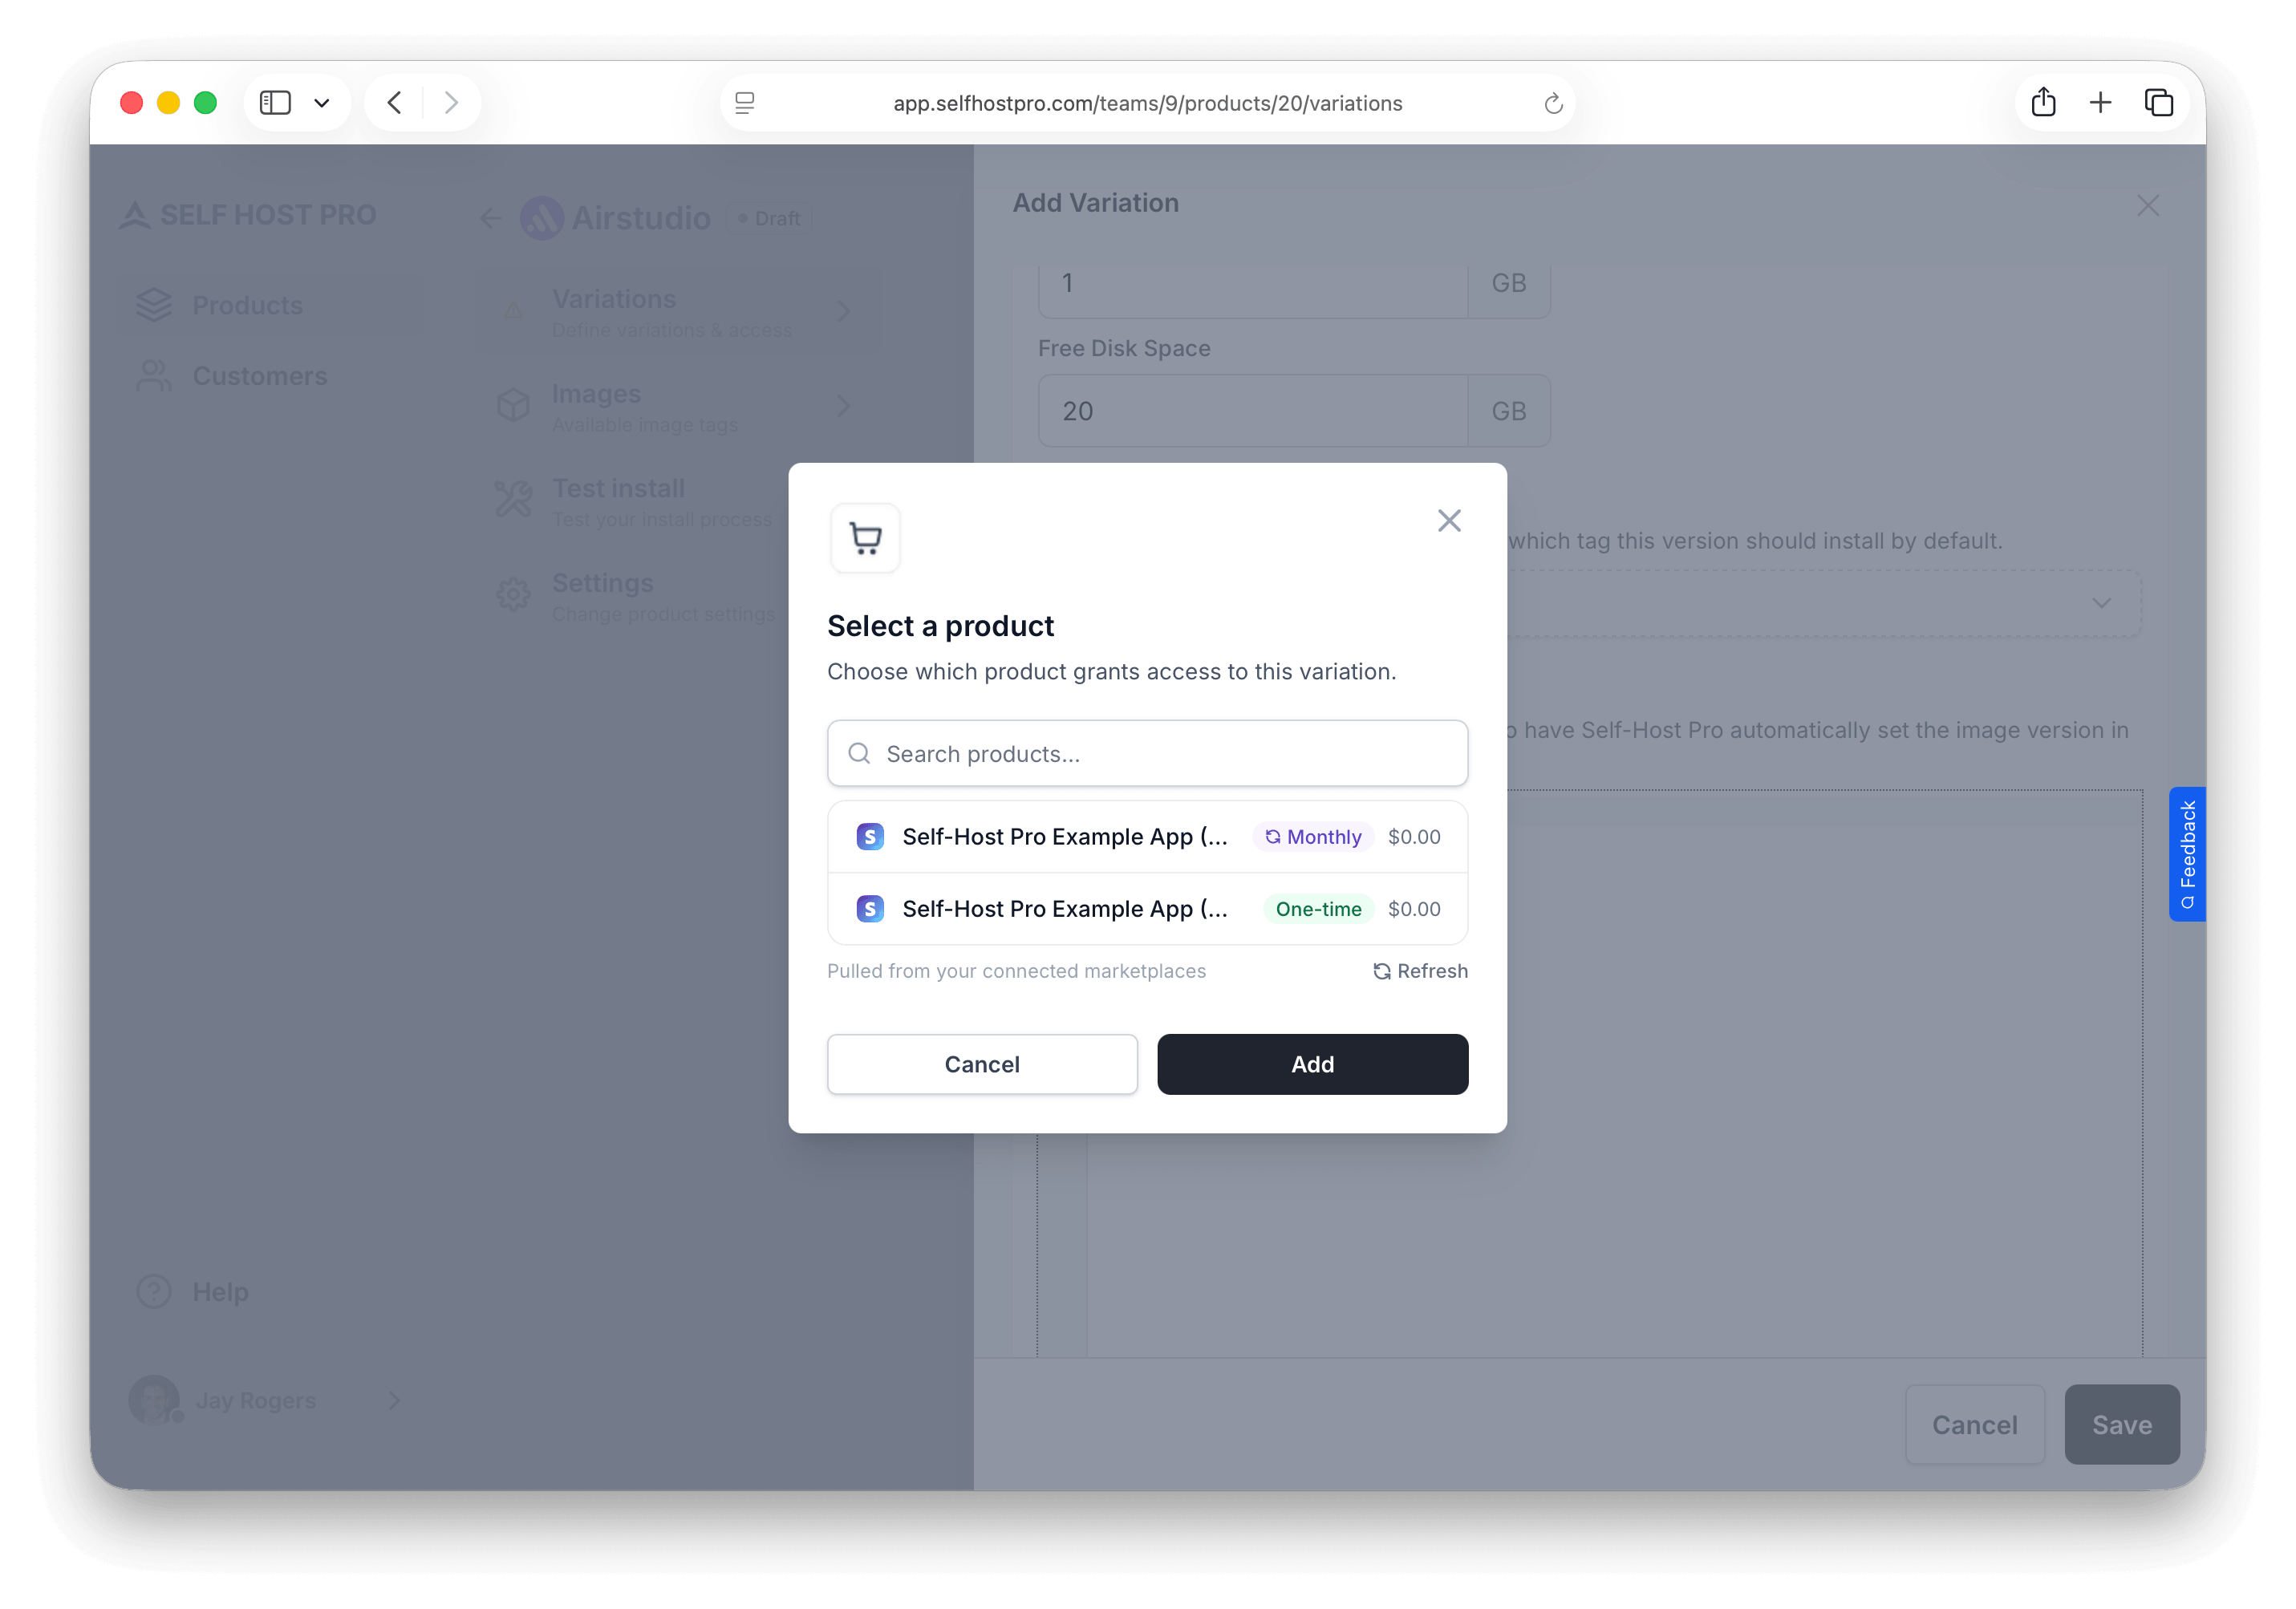
Click Add Product to open the product picker. It loads all products from your connected payment integrations. Each product is labeled as One-time or Monthly/Yearly with its price.
Select a product, then configure Access Duration:
For subscription products — No duration to set. Access is tied to the subscription and revoked automatically when it ends. The table shows "While subscribed".
For one-time products — Choose how long access lasts after purchase:
| Option | Description |
|---|---|
| Expire after X days | Access is revoked after the specified number of days |
| Never expires | Customer keeps access permanently |
Multiple products
You can link the same variation to multiple products — for example, both a Stripe and a Lemon Squeezy listing. Customers who purchase through either provider get access. Each linked product can have its own access duration.
Image Tag Rules
The Image Tag Rules section controls which Docker image tags customers on this variation are allowed to pull from the registry. This lets you restrict access by tier — for example, "Airstudio - Basic" customers can only pull v1.* tags while "Airstudio - Pro" customers can pull everything.
Adding a rule
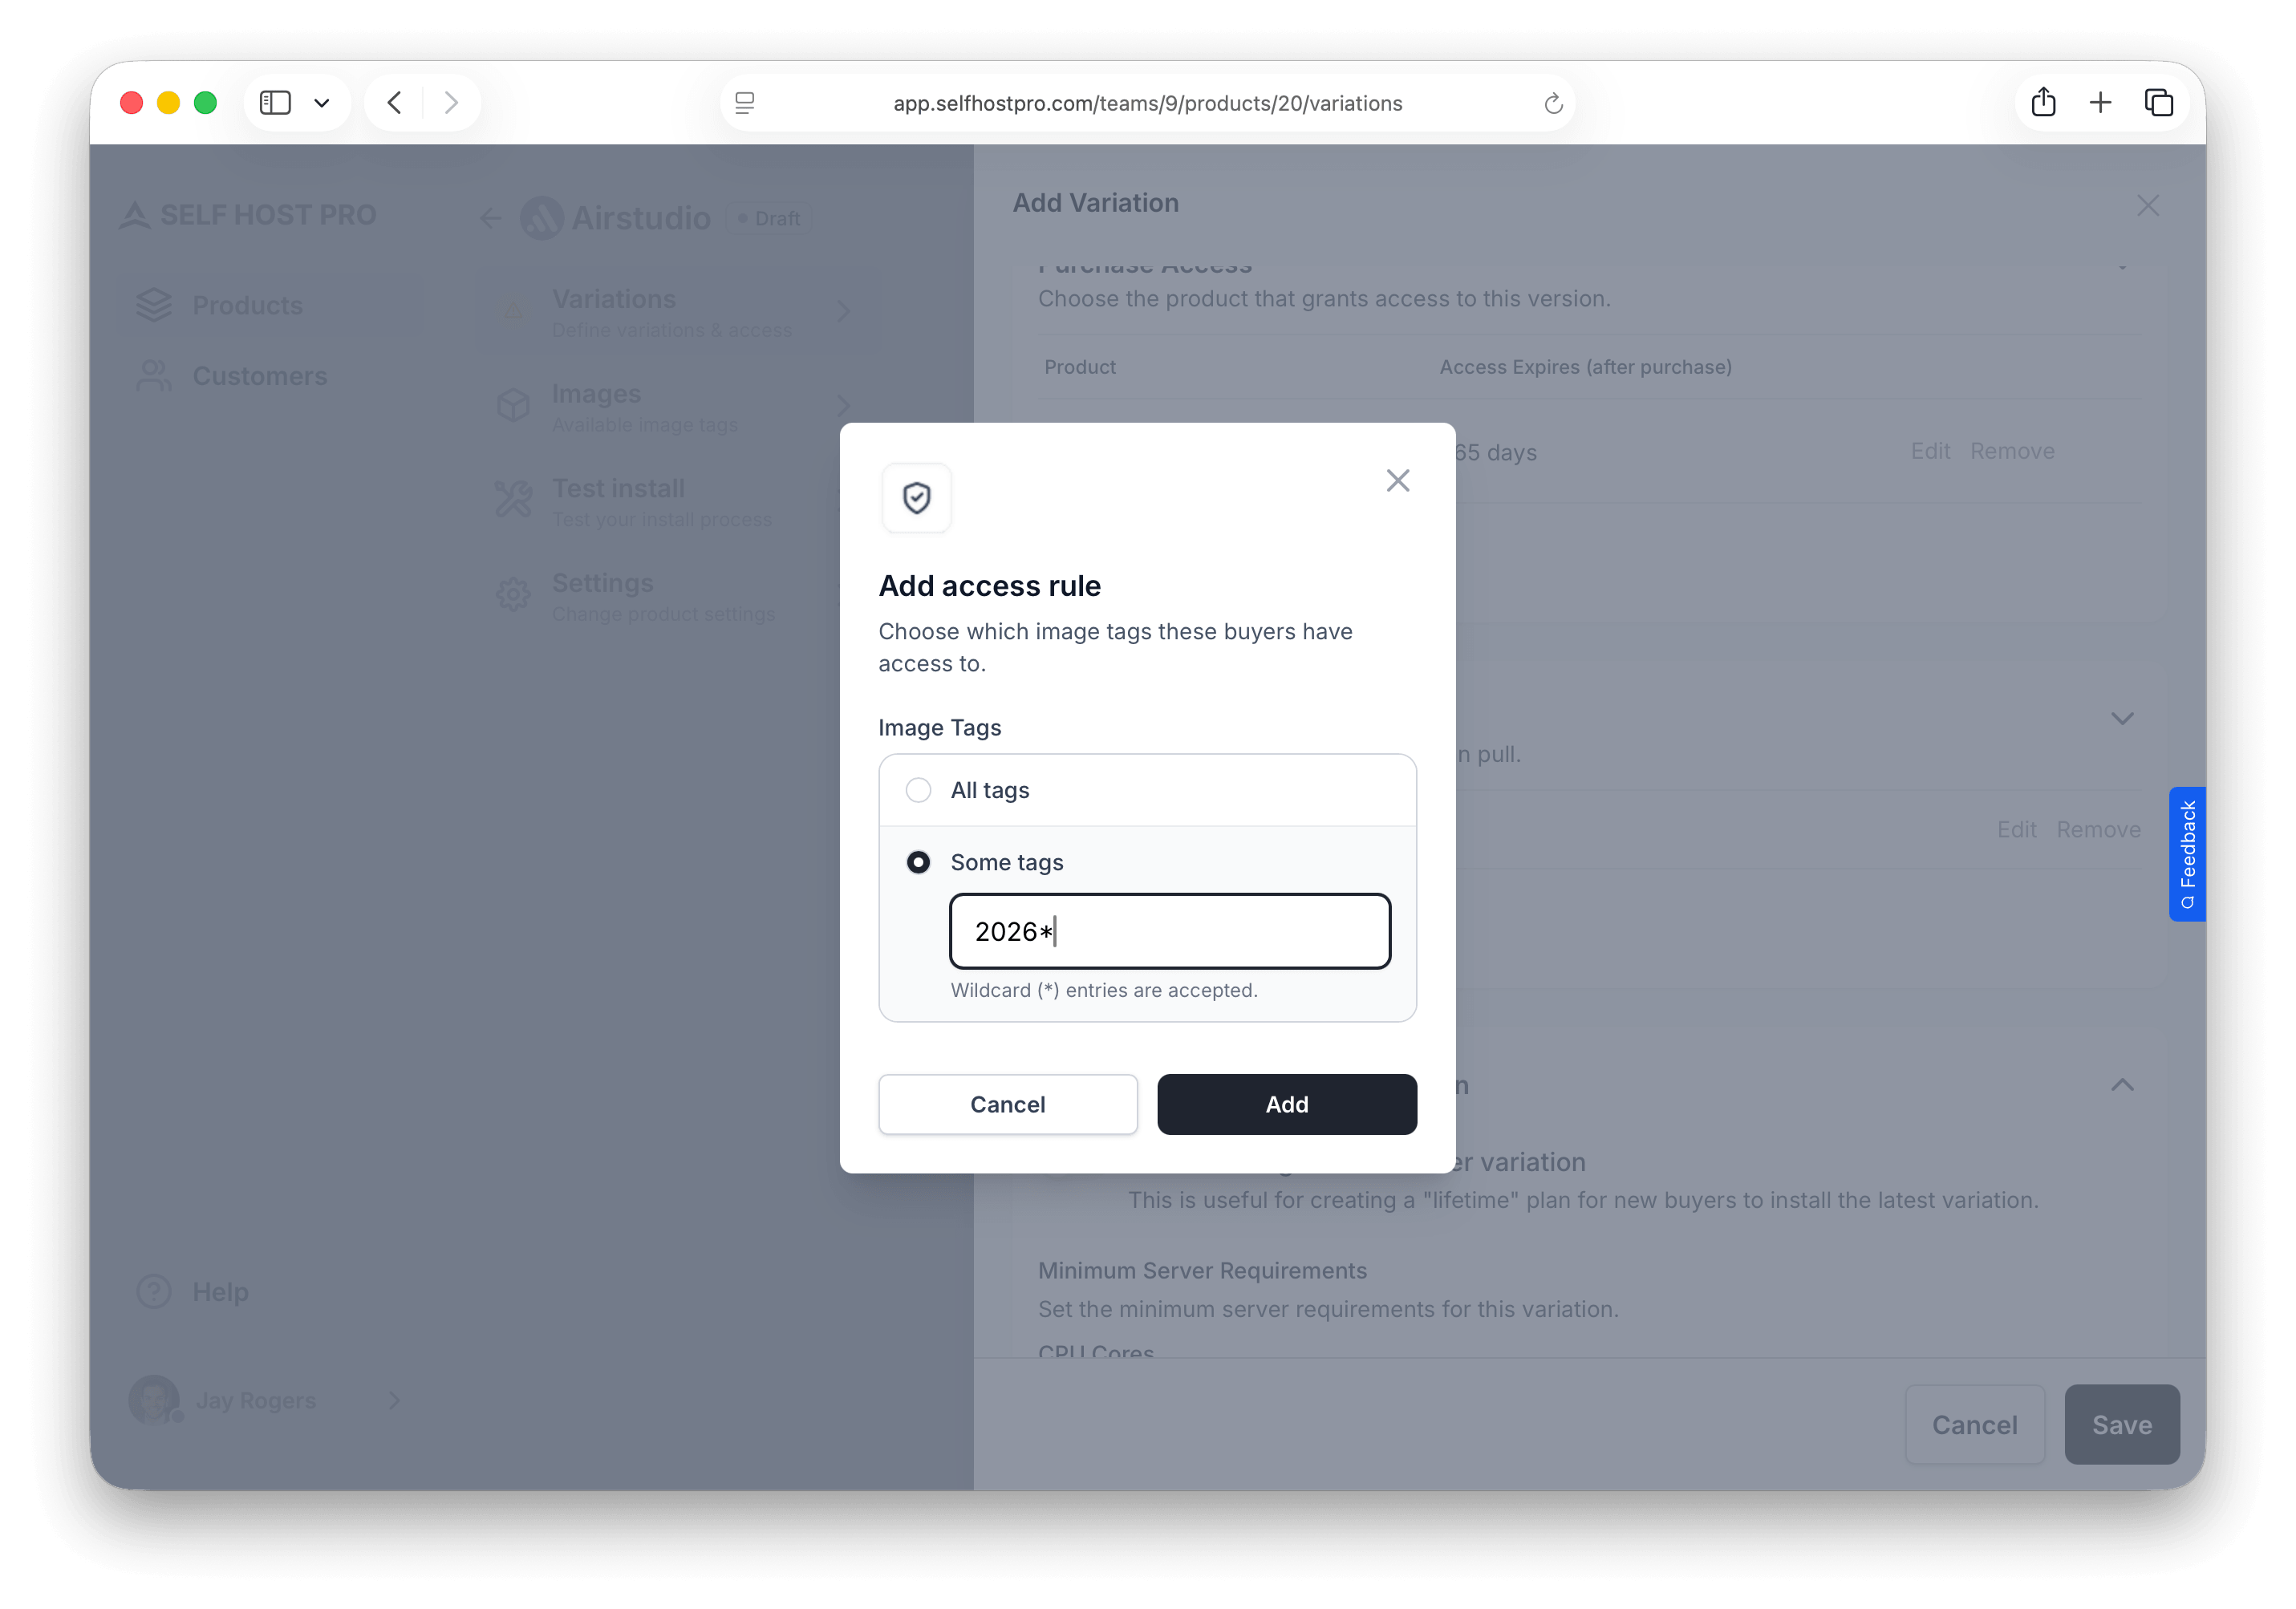
Click Add Rule and choose:
| Option | Description |
|---|---|
| All tags | Customer can pull any image tag |
| Some tags | Customer can only pull tags matching a pattern |
For Some tags, enter a pattern using:
- Exact tags:
latest,1.2.3 - Wildcard (
*):v1.*matchesv1.0,v1.1,v1.2.3, etc.
* allows access to all tags. If you want to offer tiered access — for example, preventing Basic customers from pulling pro-* tagged images — remove the wildcard rule and add specific patterns for each variation.Example: tiered tag access
| Variation | Rule | Access |
|---|---|---|
| Airstudio - Basic | v1.* | Only v1 releases |
| Airstudio - Pro | * | All releases including pro-* tags |
Tags are checked when customers pull from the registry. If a pull request doesn't match any rule, it's denied.
Installation
System requirements
Set minimum server requirements. The install script checks these before proceeding and warns customers if their server doesn't meet them.
| Field | Description |
|---|---|
| CPU cores | Minimum number of CPU cores |
| Memory | Minimum RAM in GB |
| Disk space | Minimum free disk space in GB |
New variations default to 1 CPU core, 1 GB RAM, and 20 GB free disk — adjust these if your software needs more.
Default image
Select which Docker image tag customers will install by default. This dropdown shows all images you've pushed to the registry for this product.
Docker Compose file
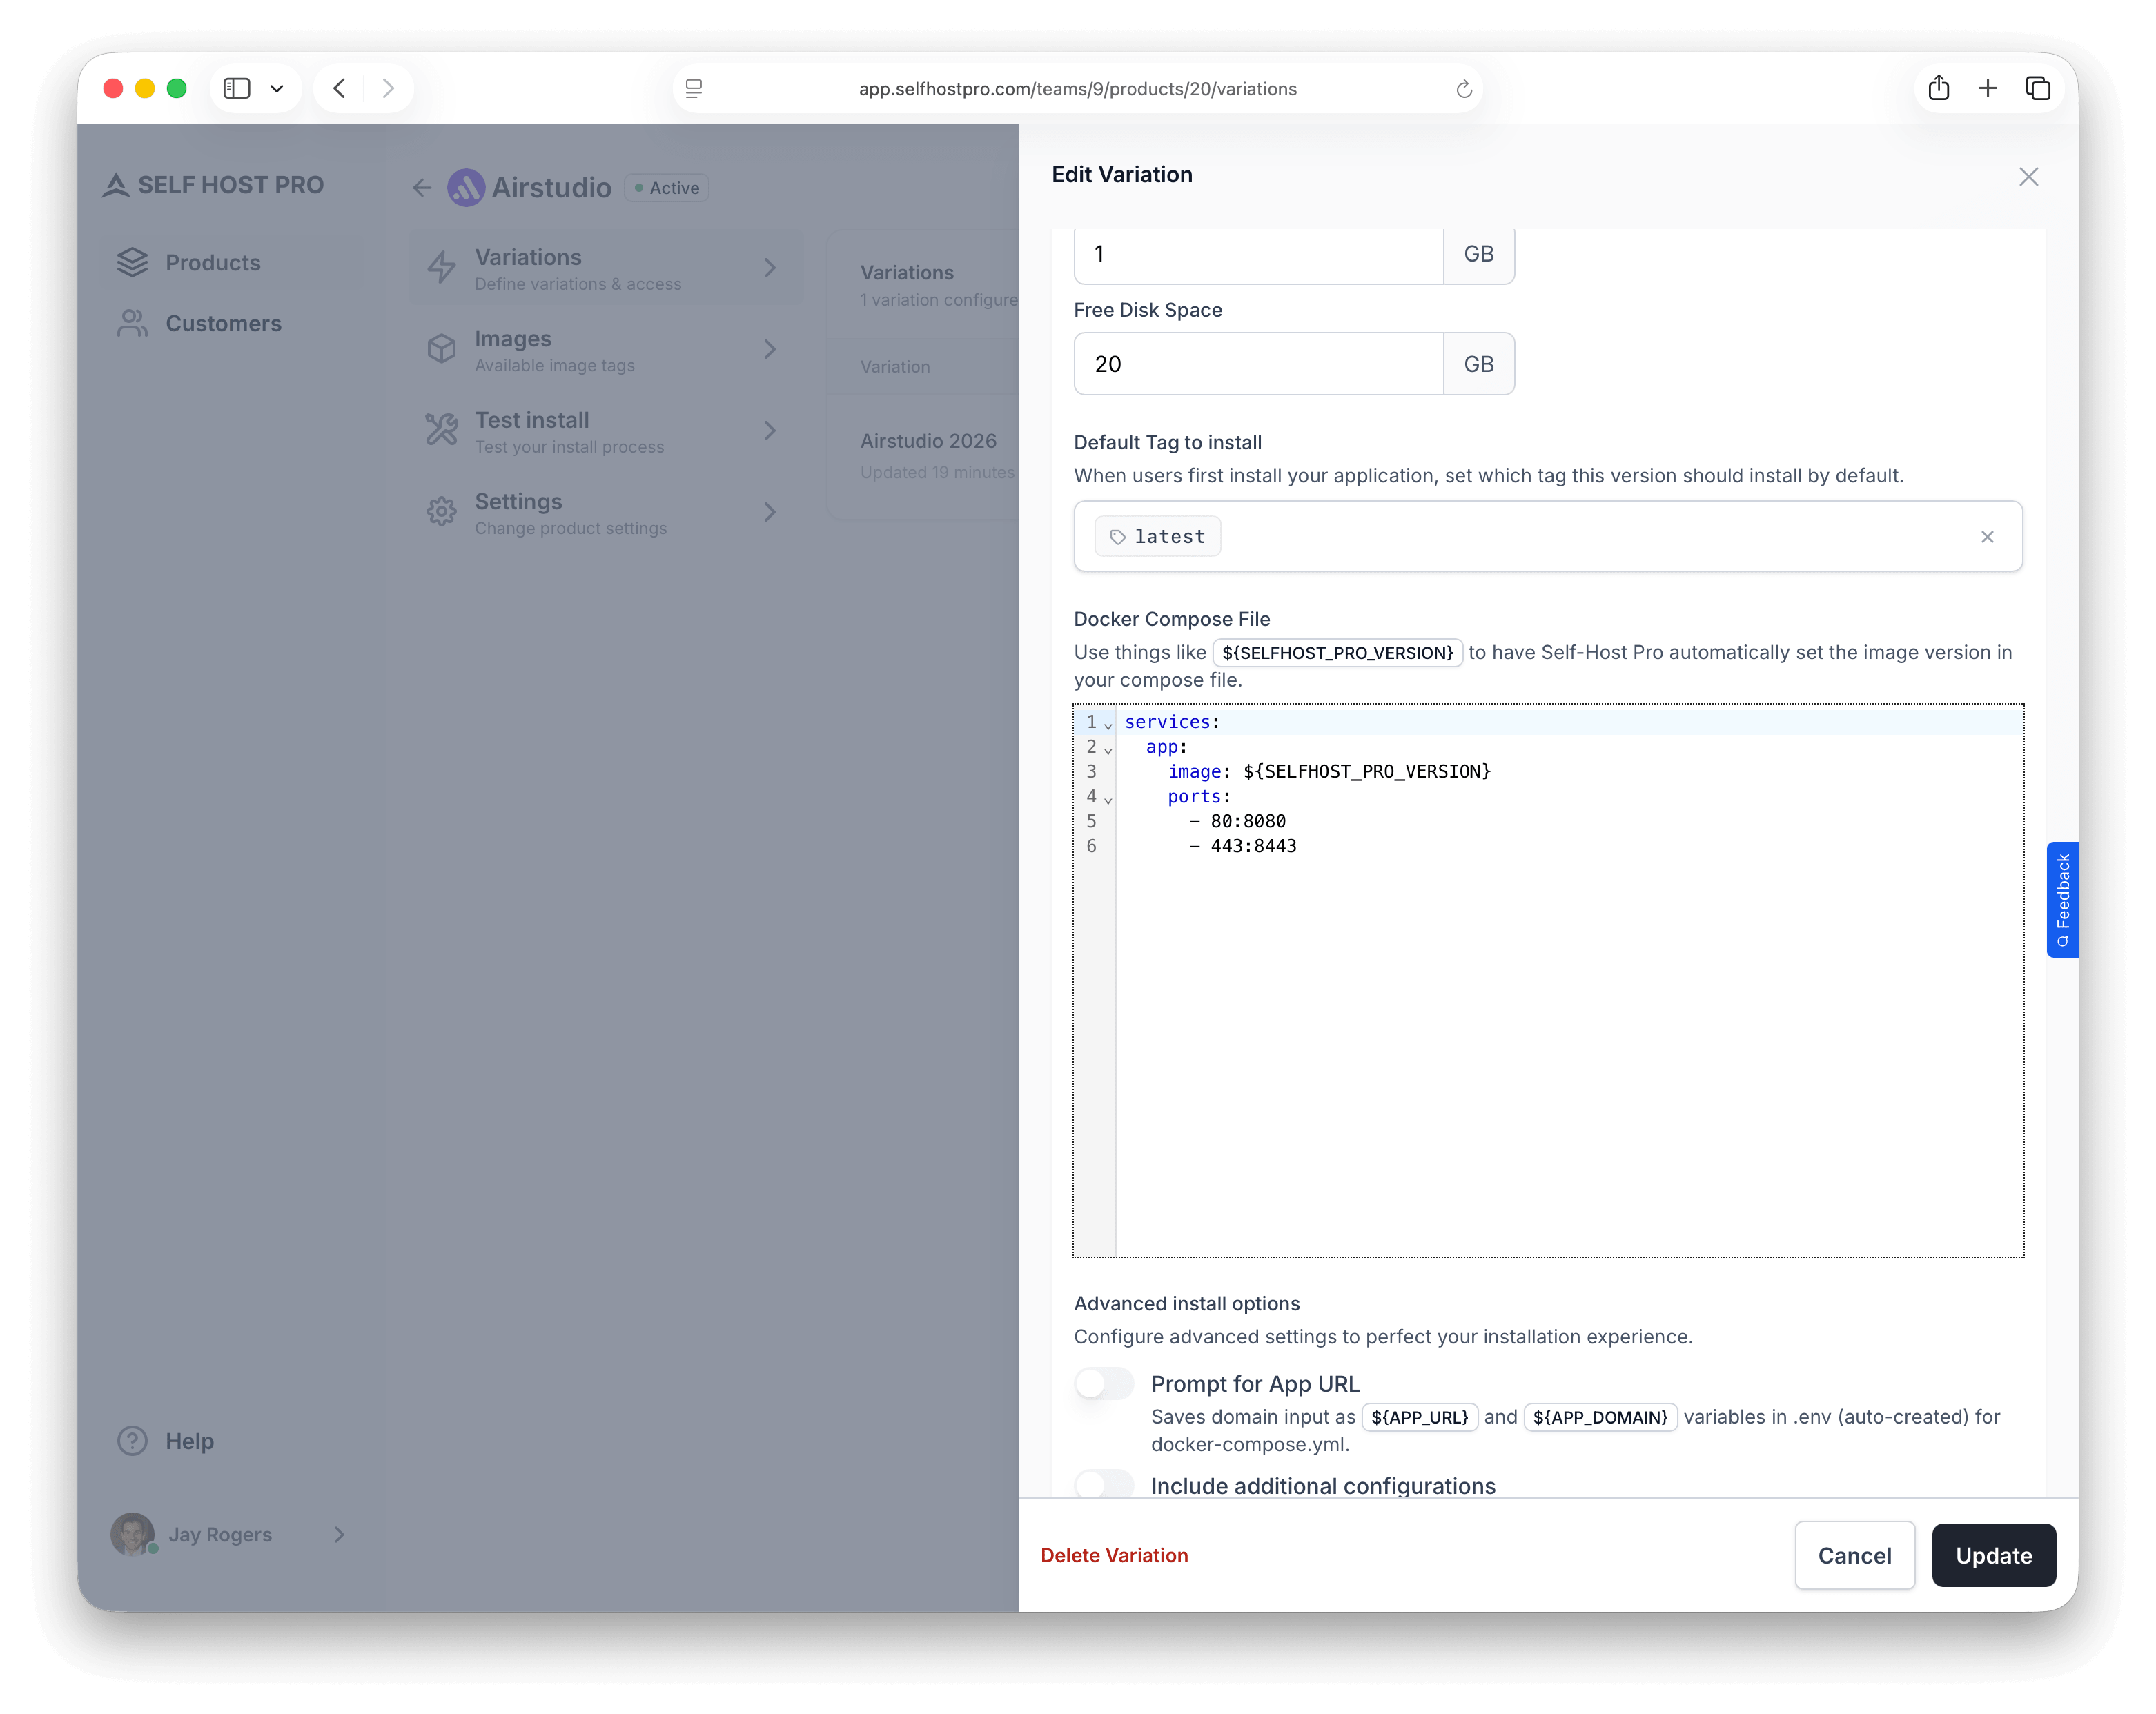
Enter your docker-compose.yml content. This file is downloaded to the customer's server during installation.
Image line and SELFHOST_PRO_VERSION
For the service that runs your product image, set the image to ${SELFHOST_PRO_VERSION} instead of a hard-coded registry URL or tag:
services:
  app:
    image: ${SELFHOST_PRO_VERSION}
When a customer installs, Self-Host Pro replaces that placeholder with the full reference for their purchase and your Default image selection — for example shpcr.io/your-team/your-product:latest. Third-party images (PostgreSQL, Redis, etc.) keep normal references like postgres:16.
Self-Host Pro works with any framework or language that runs in Docker. Here are examples for popular stacks (your app service uses ${SELFHOST_PRO_VERSION}):
services:
  app:
    image: ${SELFHOST_PRO_VERSION}
    ports:
      - "80:80"
      - "443:443"
    env_file:
      - .env
    volumes:
      - ./storage:/var/www/html/storage
    restart: unless-stopped

  database:
    image: postgres:16
    environment:
      - POSTGRES_DB=${DB_DATABASE}
      - POSTGRES_USER=${DB_USERNAME}
      - POSTGRES_PASSWORD=${DB_PASSWORD}
    volumes:
      - db_data:/var/lib/postgresql/data
    restart: unless-stopped

  redis:
    image: redis:alpine
    restart: unless-stopped

volumes:
  db_data:
services:
  app:
    image: ${SELFHOST_PRO_VERSION}
    ports:
      - "3000:3000"
    env_file:
      - .env
    restart: unless-stopped

  database:
    image: postgres:16
    environment:
      - POSTGRES_DB=${DATABASE_NAME}
      - POSTGRES_USER=${DATABASE_USER}
      - POSTGRES_PASSWORD=${DATABASE_PASSWORD}
    volumes:
      - db_data:/var/lib/postgresql/data
    restart: unless-stopped

volumes:
  db_data:
services:
  app:
    image: ${SELFHOST_PRO_VERSION}
    ports:
      - "3000:3000"
    env_file:
      - .env
    depends_on:
      - database
      - redis
    restart: unless-stopped

  database:
    image: postgres:16
    environment:
      - POSTGRES_DB=${DATABASE_NAME}
      - POSTGRES_USER=${DATABASE_USER}
      - POSTGRES_PASSWORD=${DATABASE_PASSWORD}
    volumes:
      - db_data:/var/lib/postgresql/data
    restart: unless-stopped

  redis:
    image: redis:alpine
    restart: unless-stopped

  sidekiq:
    image: ${SELFHOST_PRO_VERSION}
    command: bundle exec sidekiq
    env_file:
      - .env
    depends_on:
      - database
      - redis
    restart: unless-stopped

volumes:
  db_data:
services:
  app:
    image: ${SELFHOST_PRO_VERSION}
    ports:
      - "8000:8000"
    env_file:
      - .env
    depends_on:
      - database
    restart: unless-stopped

  database:
    image: postgres:16
    environment:
      - POSTGRES_DB=${DATABASE_NAME}
      - POSTGRES_USER=${DATABASE_USER}
      - POSTGRES_PASSWORD=${DATABASE_PASSWORD}
    volumes:
      - db_data:/var/lib/postgresql/data
    restart: unless-stopped

  celery:
    image: ${SELFHOST_PRO_VERSION}
    command: celery -A myapp worker -l info
    env_file:
      - .env
    depends_on:
      - database
      - redis
    restart: unless-stopped

  redis:
    image: redis:alpine
    restart: unless-stopped

volumes:
  db_data:
services:
  app:
    image: ${SELFHOST_PRO_VERSION}
    ports:
      - "8080:8080"
    env_file:
      - .env
    depends_on:
      - database
    restart: unless-stopped

  database:
    image: postgres:16
    environment:
      - POSTGRES_DB=${DB_NAME}
      - POSTGRES_USER=${DB_USER}
      - POSTGRES_PASSWORD=${DB_PASSWORD}
    volumes:
      - db_data:/var/lib/postgresql/data
    restart: unless-stopped

volumes:
  db_data:
${APP_URL} and ${APP_DOMAIN} can reach your Compose file in three ways: via Prompt for install domain (Self-Host Pro detects and asks the customer), via a config file with a default value and Prompt to edit (customer edits in nano/vim), or pre-filled in a config file and shipped as-is.Prompt for install domain
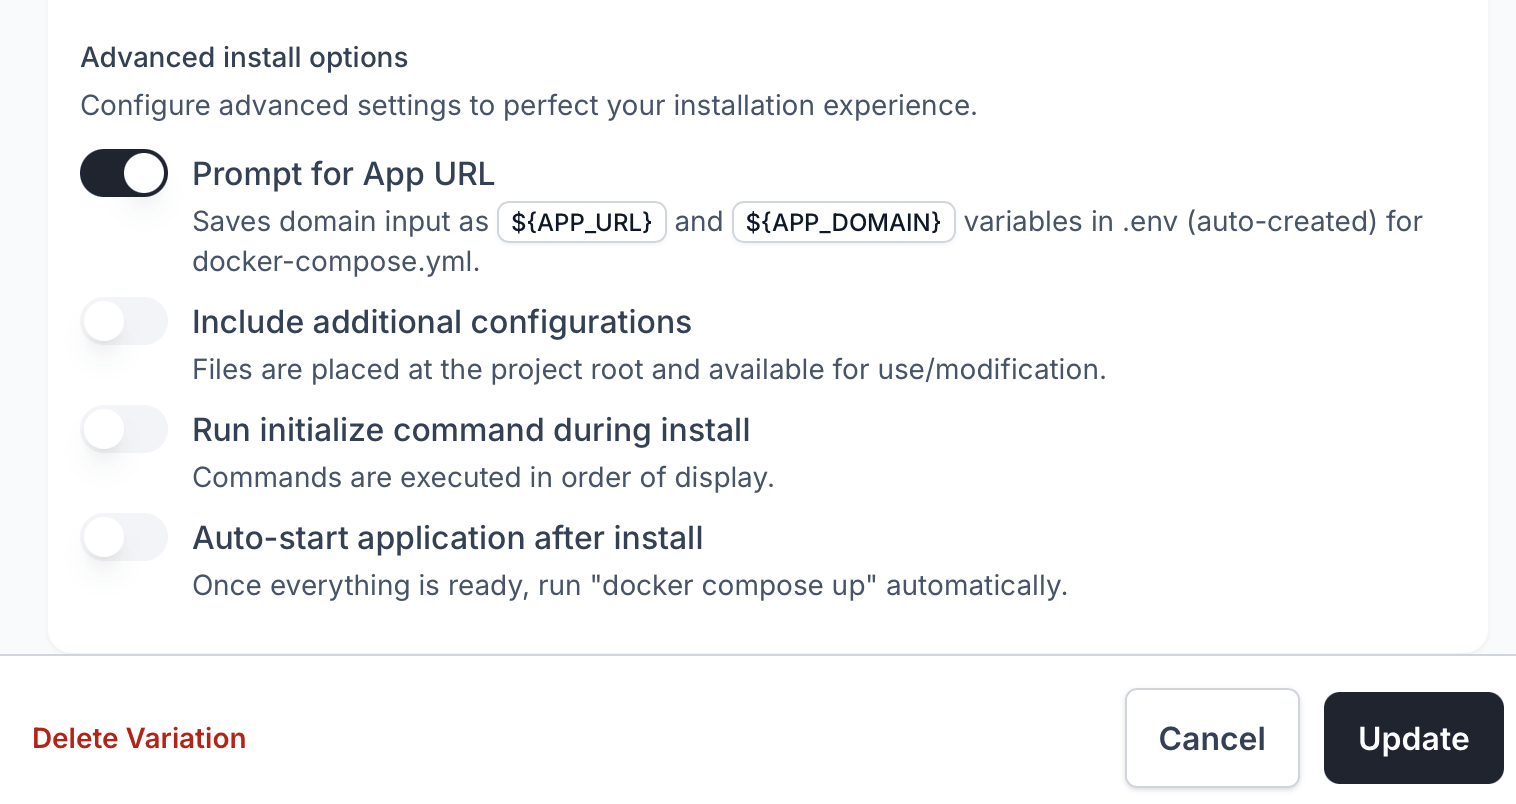
When enabled, the install script:
- Detects the server's public IP address automatically
- Prompts the customer to confirm or enter a custom domain/IP
- Validates the URL format (supports IPv4, IPv6, and domain names)
- Writes
APP_URLandAPP_DOMAINto the.envfile
Example prompt the customer sees:
What URL will you use to access this application?
Examples:
  • Using IPv4 address:  https://192.168.1.100
  • Using IPv6 address:  https://[2001:db8::1]
  • Using domain name:   https://app.example.com

Press Enter to use: https://203.0.113.50 (automatically detected)
This is useful when your app needs to know its public URL for generating links, configuring SSL certificates, or setting CORS headers.
Configuration files
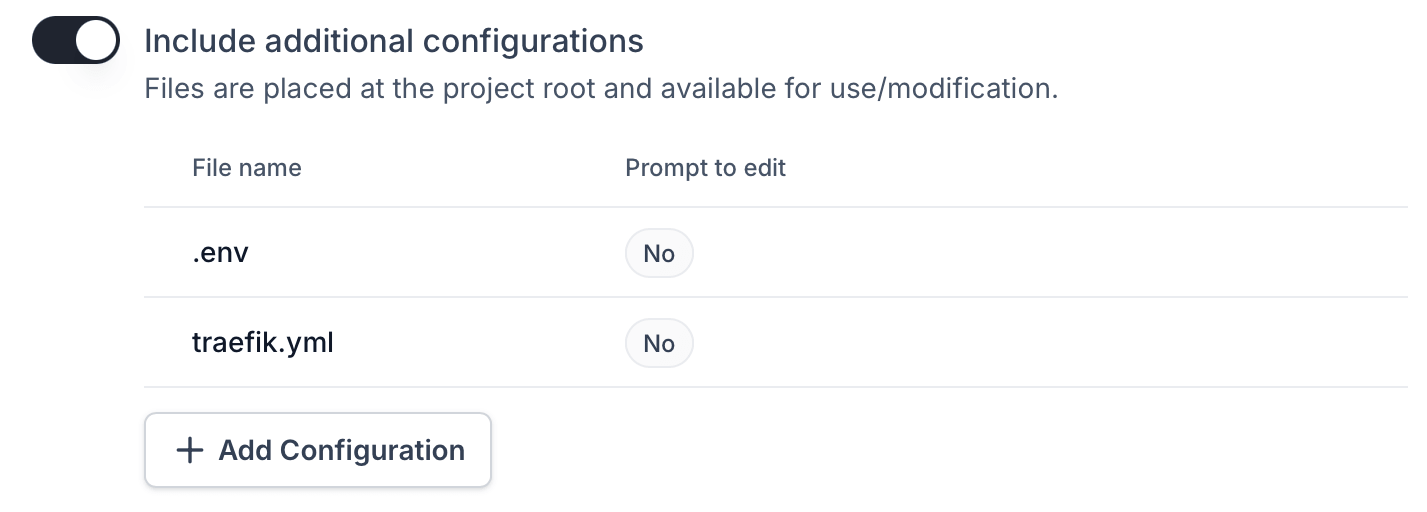
Add files that should be created in the project directory during installation. Common uses:
.envfiles with environment variables- Nginx or Traefik configuration
- SSL certificates
- Custom application config files
For each configuration file, you can set:
| Field | Description |
|---|---|
| File name | The filename (e.g., .env, traefik.yml) |
| Contents | The file contents |
| Permissions | chmod value (e.g., 600 for sensitive files, 644 for readable files) |
| UID/GID | File ownership — must match the user inside your Docker container |
| Prompt to edit | When enabled, opens the file in the customer's editor during install |
www-data, node, app), the UID/GID of mounted files must match that user's UID/GID inside the container. Otherwise, your application won't be able to read the files.Common UID/GID values:www-data(PHP/Laravel):82:82or33:33depending on the base imagenode(Node.js):1000:1000app(custom user): Check your Dockerfile
docker run --rm your-image idExample: .env file
Create a .env file that customers can customize during installation. Here are examples for different frameworks:
File name: .env
APP_NAME="My Application"
APP_ENV=production
APP_DEBUG=false
APP_URL=
APP_DOMAIN=

DB_CONNECTION=pgsql
DB_HOST=database
DB_PORT=5432
DB_DATABASE=app
DB_USERNAME=app
DB_PASSWORD=change-me-to-a-secure-password

MAIL_MAILER=smtp
MAIL_HOST=
MAIL_PORT=587
MAIL_USERNAME=
MAIL_PASSWORD=
MAIL_FROM_ADDRESS=
NODE_ENV=production
APP_URL=
APP_DOMAIN=

DATABASE_URL=postgresql://app:change-me@database:5432/app

NEXTAUTH_SECRET=generate-a-random-secret
NEXTAUTH_URL=${APP_URL}
RAILS_ENV=production
APP_URL=
APP_DOMAIN=

DATABASE_URL=postgresql://app:change-me@database:5432/app
REDIS_URL=redis://redis:6379/0

SECRET_KEY_BASE=generate-a-random-secret
DEBUG=False
APP_URL=
APP_DOMAIN=

DATABASE_URL=postgresql://app:change-me@database:5432/app
REDIS_URL=redis://redis:6379/0

SECRET_KEY=generate-a-random-secret
ALLOWED_HOSTS=${APP_DOMAIN}
APP_ENV=production
APP_URL=
APP_DOMAIN=

DB_HOST=database
DB_PORT=5432
DB_NAME=app
DB_USER=app
DB_PASSWORD=change-me-to-a-secure-password
Permissions: 600 (owner read/write only — keeps secrets secure)
Prompt to edit: Yes
When "Prompt to edit" is enabled, the install script will:
- Download the file
- Ask the customer if they want to edit configuration files
- Open their default editor (nano, vim, etc.)
- Let them customize values before the application starts
APP_URL and APP_DOMAIN in the .env file after the customer enters their URL.Example: Traefik configuration
For applications using Traefik as a reverse proxy:
File name: traefik.yml
Contents:
api:
  dashboard: false

entryPoints:
  web:
    address: ":80"
    http:
      redirections:
        entryPoint:
          to: websecure
          scheme: https
  websecure:
    address: ":443"

certificatesResolvers:
  letsencrypt:
    acme:
      email: ${ACME_EMAIL}
      storage: /letsencrypt/acme.json
      httpChallenge:
        entryPoint: web

providers:
  docker:
    exposedByDefault: false
Permissions: 644
Prompt to edit: No
Initialize commands
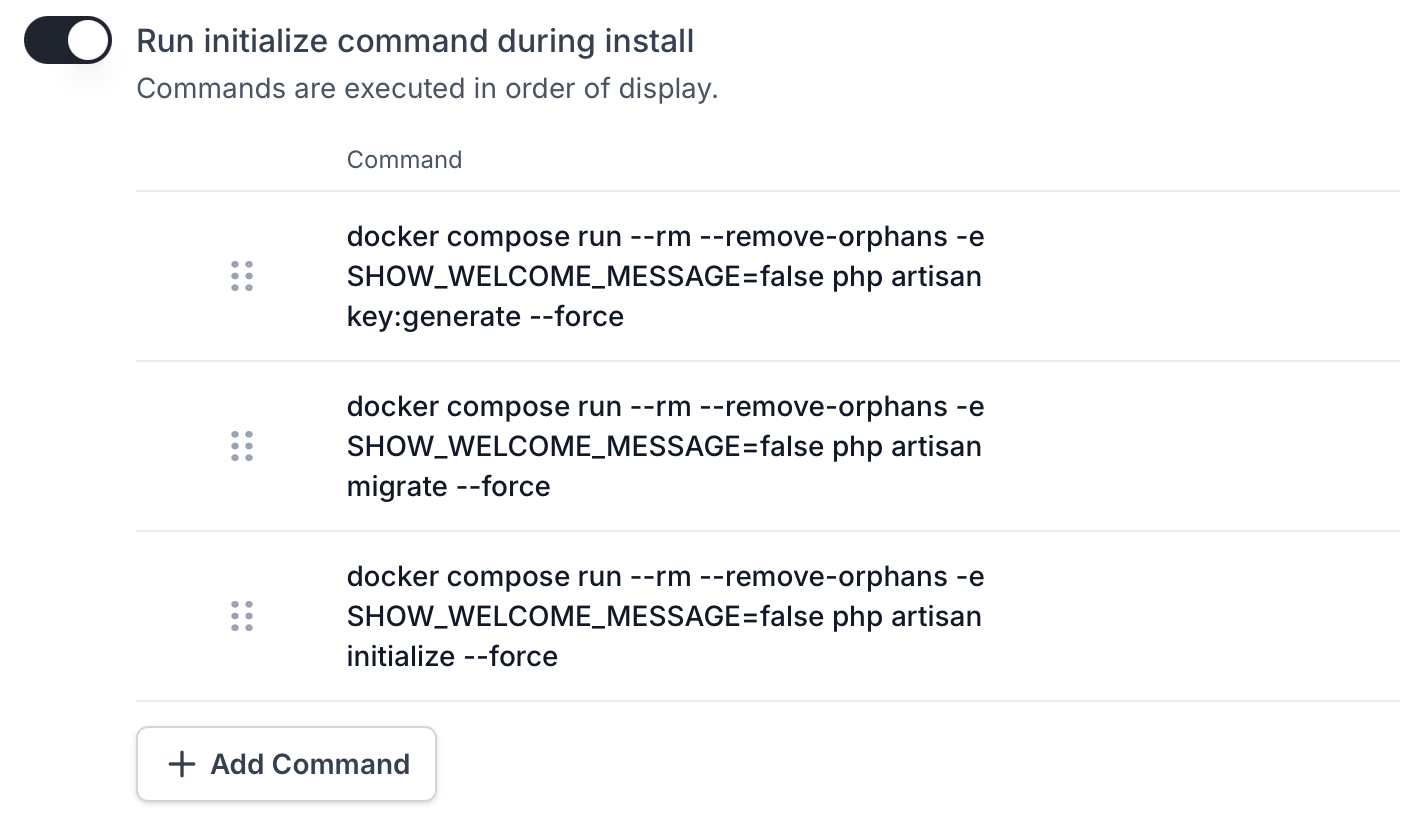
Commands that run from the project directory on the host server, before the application starts. Use these for one-time setup tasks:
- Database migrations
- Seeding initial data
- Generating application keys
- Running setup wizards
- Creating admin users
Commands execute from the project directory (/srv/{product-slug}/) where your Docker Compose file and configuration files are located. You can run any system command — shell scripts, file operations, or system utilities.
To run commands inside your Docker containers, use docker compose run. Add commands in the order they should execute.
Examples by framework:
docker compose run --rm app php artisan key:generate --force
docker compose run --rm app php artisan migrate --force
docker compose run --rm app php artisan db:seed --force
docker compose run --rm app rails db:create
docker compose run --rm app rails db:migrate
docker compose run --rm app rails db:seed
docker compose run --rm app python manage.py migrate --noinput
docker compose run --rm app python manage.py collectstatic --noinput
docker compose run --rm app python manage.py createsuperuser --noinput
docker compose run --rm app npx prisma migrate deploy
docker compose run --rm app npx prisma db seed
docker compose run --rm app /app/migrate -path /migrations -database "$DATABASE_URL" up
Each command runs in sequence. If any command fails (non-zero exit code), the installation stops and shows an error. Reorder commands in the dashboard (drag and drop) to change execution order.
--rm flag to automatically remove the container after the command completes. Use --force, --noinput, or -n flags to skip interactive prompts since the install script runs non-interactively./srv/{product-slug}/ with full access to system utilities. For example, you could run a sed command to modify a file. However, most initialization tasks are best performed inside your container for security and isolation.Auto-start application after install
When enabled, the install script automatically runs docker compose up -d after:
- Downloading all files
- Configuring the domain (if enabled)
- Letting the customer edit files (if enabled)
- Running initialize commands (if configured)
When disabled, the install script downloads and configures everything but doesn't start the containers. The customer sees step-by-step instructions for starting manually. This is useful if you want customers to review configuration before starting.
How the install script works
When a customer runs the install command, here's what happens:
- System checks — Verifies Linux, root/sudo access, CPU, memory, and disk space
- Docker installation — Installs Docker if not present
- Project directory — Creates
/srv/{product-slug}/ - Docker Compose file — Downloads your compose configuration
- Configuration files — Downloads additional files (
.env, etc.) - Domain prompt — Asks for URL and writes to
.env(if enabled) - Registry authentication — Logs into
shpcr.ioto pull your images - File editing — Opens editor for files marked "Prompt to edit" (if enabled)
- Initialize commands — Runs your setup commands (if configured)
- Start application — Runs
docker compose up -d(if enabled)
The customer sees colored output with progress indicators:
▸ Checking system requirements...
✓ CPU cores: 4 (minimum 1 required)
✓ Memory: 8192KB (minimum 524288KB required)
✓ Disk space: 50000000KB (minimum 1048576KB required)

▸ Configuring My App project...
ℹ Creating project directory: /srv/my-app
✓ Project directory created
ℹ Downloading docker-compose.yml...
✓ Downloaded and configured: docker-compose.yml
ℹ Downloading .env...
✓ Downloaded and configured: .env

▸ Configuring application access URL...
ℹ Detected server IP: 203.0.113.50
✓ Application URL set to: https://203.0.113.50

▸ Authenticating with Docker registry...
✓ Docker registry authentication successful

▸ Starting My App with Docker Compose...
ℹ Pulling latest Docker images...
✓ Images pulled successfully
ℹ Running initialization commands...
✓ Initialization completed successfully
✓ My App is now running!
Installation security
Self-Host Pro protects your software with multiple security measures during installation:
One-time use scripts
Each install script can only be used once. When a customer runs the script, it's marked as consumed and cannot be reused. This prevents script sharing and ensures each installation is authorized.
Short-lived scripts
Install scripts expire after 60 minutes. This limits the window of opportunity if a script URL is exposed.
IP address binding
When a customer runs the install script, their IP is stored on that install. While the install is in progress, download URLs inside the script (Docker Compose, config files, registry credentials) only work from that same IP. Requests from another IP get 403 Access denied. This reduces credential sharing and scripted replay from another network.
Registry authentication
Docker images are served from a private registry (shpcr.io) that requires authentication. Customers must have valid access tokens to pull your images, and these tokens are tied to their purchase status. When a subscription expires or access is revoked, they can no longer pull updates.
Mirroring variations
When creating a new variation, you can set it to mirror another variation. Mirroring means the variation uses the source variation's install configuration at install time — this includes the Docker Compose file, configuration files, initialize commands, and installation options.
This is useful for offering multiple tiers that share the same underlying installation but differ in pricing or access rules. For example, "Airstudio - Basic" and "Airstudio - Pro" might install identically but give access to different Docker image tags.